
Last Updated on October 17, 2023 by Amanda P. Brown
Celebrating a baby’s 1st birthday is always memorable to the parents. As parents always try to give their best at their baby’s first birthday party, so they sometimes get confused to decide what kind of food they will arrange for their baby’s 1st birthday.
Celebrate your baby’s 1st birthday with the following food items. These 1st birthday food ideas (from cake to appetizers) will make the birthday special for both parents and children.
38 Best 1st Birthday Food Ideas:
Table of Contents
- Unicorn Birthday Cake
- Small Ham and Cheese Puff
- Cone Ice-cream Chocolate Cupcakes
- Rainbow Cupcakes
- Chocolate Chips Cookies
- Butter Corn
- Cheese cubes
- French Fries
- Mini Sandwiches
- Fruit skewers
- Cowboy caviar
- Pink Lemonade
- Vanilla Milkshake
- Red velvet shot
- Color changing lemonade
- Raspberry Lemonade
- Pink Drink
- Frozen Mudslide
- Chocolate Martini
- Espresso Martini
- Cheese Pizza
- Mini Mac and Cheese Hot Dogs
- Taco Dip Platter
- Pasta with Meatballs
- Party Bread
- Baked Wontons
- Barbecue Wings
- Railroad Pie
- Baked Chicken Tenderloins
- Brownie Bowls
- Donuts
- Churros
- Unicorn Sundaes
- Cheesecake Flan
- Ice Cream Tacos
- Ice Cream Cake Pops
- Balboa Bars
- Dirt Dessert
What Flavor Cake Is Best for 1st Birthday Party?
Chocolate cake, it is the most favorite item to anybody. From children to adults, everybody loves to eat it. Chocolate adds another level of taste to 1st birthday cake. Except for this chocolate cake, you can choose another flavor to make the first birthday cake, which also increases your cake taste. They are; cinnamon cake, coffee cake, cheesecake, vanilla cake, pineapple cake, etc.
1st Birthday Cake Ideas
The cake is most important part for the birthday party. Children always have craving for cake.
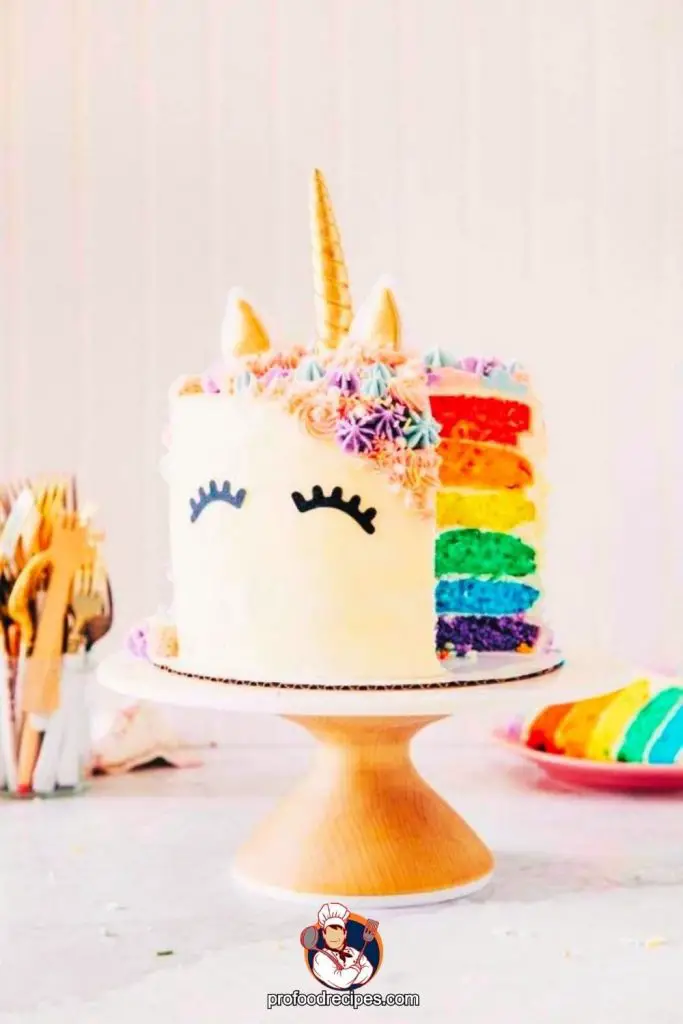
1. Unicorn Birthday Cake
Ingredients
| For Cake | • All-purpose flour • Two 16 ounces white cake mix • Cooking spray • ¼-Cup rainbow sprinkle |
| For decorating | • 1 Strip rainbow-striped sour candy belt (24 inches long) • 2-Ounces cotton candy • 2-Cups sweetmeat sugar • Blue Food color (coloring for the horn and ear) • 2-Cups mini marshmallows • Blue and pink mix candies • 1 strand black licorice (must be thin 12 inches) |
| For buttercream | • 4-Tablespoons of milk • 1-Tablespoon vanilla extract • 1-Pound unsalted butter (at room temperature) • 8-Cups confectioners’ sugar • Pinch of salt |
Tools You Need:
- Round cake pans (8 inches)
- Lollipop sticks (8 inches with rice and dried beans)
Baking Process:
- For the cake baking, first, you preheat the oven at 350 degrees. Grease the 8 inches pan with cooking spray and sprinkle some flour into it. Follow the package instructions to make the cake batter.
- After making the batter, put and divide the batter into 4- ready pans. Bake the cake; it takes 26 to 29 minutes to bake. After finishing the baking, let it be cool for 10 minutes. Now you can remove it from the pans.
Cake Decoration:
- Create the ears and horn. Take a large microwave bowl; put the marshmallows into it with 2- teaspoon water.
- Microwave this nearing 1 minute, until it’s melted.
- Give half sugar on this mixture; after kneading, the mixture again gives remain sugar on it. Keep mixing to make it completely pliable and smooth.
- Divide the marshmallows mixture into 3- portions, attach 1- drop of blue color, and mix it properly until combine.
- Use a sharp knife to take away one section of the blue combination and another ¼ inch roll out to the thickness.
- For the unicorn ears, you have to cut 2 inches triangle inside of this. Take the remaining blue mixture and roll up in a thick size. Use
- water to brush the lollipop stick. You should start with the thickest division of this part in a pointed horn.
- Force down softly around to the stick. Pour the jar with dried rice and dried beans to dry.
- Try to remove the remaining marshmallows with the help of a sharp knife. Again cut the outside 3 inches triangles for the unicorn ears.
- With a small amount of water, brush the large side of the ears. Fix on the smaller blue ears. And make the smaller face. Let keep them dry.
Buttercream:
- Take a large bowl, beat the ingredients (salt, butter, sugar) until combined. After that, add 1- tablespoon vanilla and milk, then beat it again to make the frosting.
To Make a Cake Flat or Plain:
- Cut the top side of the cake.
- Give the frosting on the top of the cake layer.
- Follow this process again to frost another layer.
- After finish, the process of frosting layers, wrap the cake with frosting. Let them set now; it takes 12 minutes to set. Then put the cake on the cake stand.
- For making U shape on the cake, cut 3 inches from licorice and join with the cake.
- To make eye for eyelashes, you have to cut down ½ inch licorice and stamp 5- along the bottom. Cover the strip of cakes with the remaining frosting. Join the candies on the cake and add ears and horns.
- It takes time a total of 3 hours to make.
Snacks or Finger Food Ideas:
Snacks are one of the crucial parts of 1st birthday food ideas. Some snacks or finger food items are given below, which can be a good choice for the 1st birthday party.
2. Small Ham and Cheese Puff

This is a little tasty filling potluck that can be served at the first birthday party. Every child loves to bite this tasty and cheesy dish yet.
| Ingredients | Tube pre-rolled puff (8 ounces) ½-Cup shredded cheese (you can use grated cheddar cheese) 1-Cup thinly diced ham (120 g) Medium eggs or 1- large egg Chopped onion½ teaspoons Dijon mustard ½ teaspoon pepper |
| Nutrition facts: | 4g Protein 8g Carbohydrates 263 mg Sodium 6g Fat 25mg of Cholesterol |
Cooking Process:
- Beat the egg in a large bowl; add all the ingredients together (ham, onion, cheese, Dijon mustard, pepper).
- Cut the rolls into 24 portions and make round mini muffin cups, or you can also cut them into 7.5-9 cm square.
- Fill 1- tablespoon ham mixture into the middle of each cup or square and bake it until it’s brown; it can take time 15-18 minutes.
Notes: Before baking the puff pastry, preheat the oven to 375 degrees, and don't press the puffs too much during baking.
3. Cone Ice Cream Chocolate Cupcakes
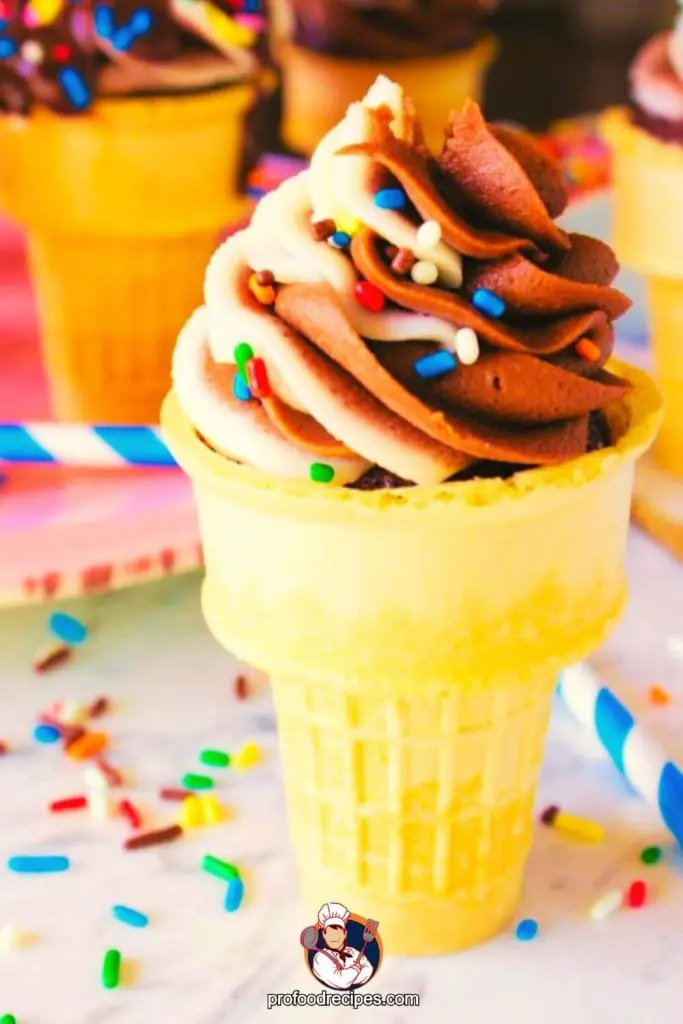
The full filling chocolate cone ice-cream looks so adorable and tasty that everyone loves to eat at the birthday party. And so this food item takes place in our 1st birthday food ideas.
| Ingredients | 20 Ice cream cake cones (should be 3 inches tall) A bunch of Yellow or French vanilla cake mix Colored sprinkle ¼-Cup shortening 4-Cups Chocolate chips 6-Cups of sweetmeat sugar 1-Cup softened butter¼ cup of milk ½-Cup shortening 1-Tablespoon of vanilla essence (can be used any essence by your taste) |
| Nutrition | 2.1g Protein 159.4 Calories 38.7mg Potassium 32.8mg of Cholesterol 24.7g Carbohydrate 87.0mg Sodium |
Baking Process:
- Prepare the cupcake batter according to the package direction. Put the ice-cream cones in mini muffin cups. Take 1/8 or 2 tablespoon batter and fill the grease of muffin cups. Bake the cake at 350° in the oven
- You have to bake it until the knife comes out clean. It may take time 15-20 minutes.
Frosting Process
- Shortening and beat the butter until it is fully blended. Beat the milk, vanilla, and sweetmeat sugar slowly till the form turn soft.
- Put a little amount of frosting on each cupcake; fix it with the cone. Spread the ice-cream and the remaining frosting on the top. Freeze it for around 5-10 minutes.
- Take a metal bowl of simmering water and melt the chocolate and shortening. Gradually stirring it till the mixture is smooth. Dive the cones in this mixture and put some sprinkles to decorate.
Notes: Before taking out the cake from the pan, you have to cool it for a minimum of 5 minutes on the pan, or it will break so easily, and while serving, make sure it should be completely cool.
4. Rainbow Cupcakes

The colorful fluffy cupcake is the best snack for a toddler’s birthday party. These cupcakes are tasty and effortless to make.
| Ingredients | 3-Cups flour 1-Cup sour cream 1/3-Cup vegetable oil 1-Cup white cake mix ½-Cup milk 2- Eggs Food colors (for rainbow coloring, use 5- colors) 5- Tablespoon milk 6 -Cups powder sugar Pinch of salt 3- Sticks softened butter ½-Teaspoon coconut extract ½-Teaspoon vanilla extract |
| Nutrition (for 24 cupcakes) | 2g Protein 202mg Sodium 42mg of Cholesterol 363 Calories 56g Calcium 52g Carbohydrate 40g Sugar 121mg Potassium Chocolate chips cookies |
Baking Process:
- Take a bowl, mix all ingredients well (flour, cream, vegetable oil, white cake mix).
- After ready the batter, divide the batter following your color choices. If you use 5- colors, then 1 cup worked for each color.
- Here you can use a small spoon for baking. For color decision, I suggest you can start with orange, after that yellow, after that purple, after that green, after that blue, and lastly red.
- It takes time 18-20 minutes to baking.
Frosting Process:
- To make the frosting, add powder sugar and butter, beat it to make light and fluffy.
- Then add the vanilla essence, salt, coconut extract; mix it well. It would help if you gradually beat all of this to make it soft.
- For frosting the cake, you can use a Ziploc bag; you have to cut the Ziploc bag’s corner; it is ready for decorating now.
- Now decorate your cupcakes with frosting.
Notes: Cupcakes must be cool at the time of frosting
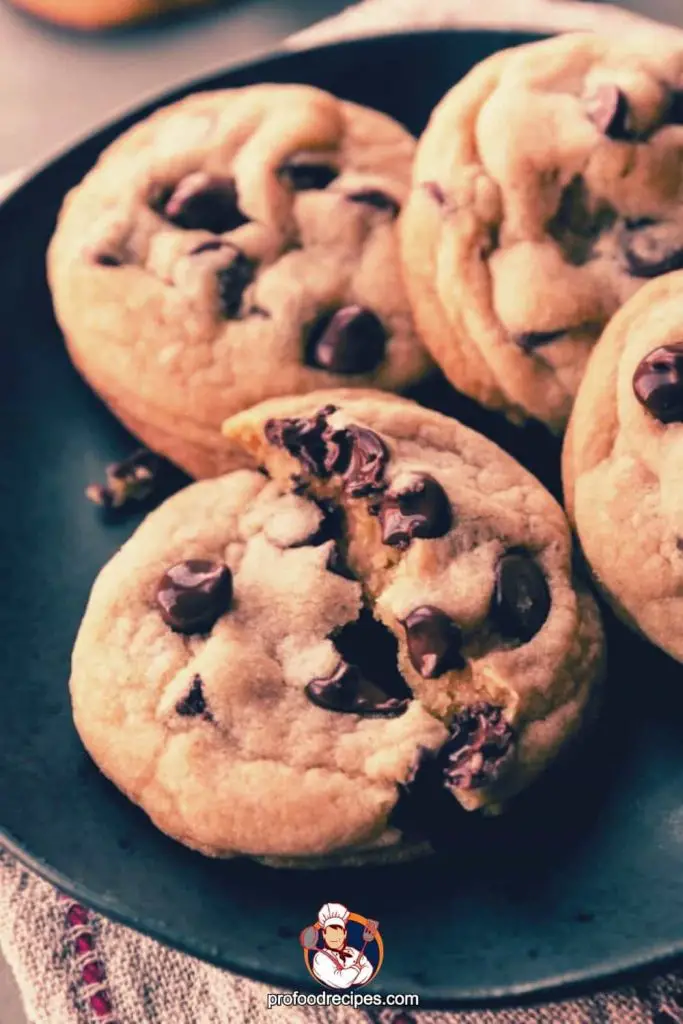
5. Chocolate Chips Cookies
| Ingredients | 2- Large eggs 1-Cup walnuts (chopped) 3-Cups flour 1-Cup softened butter 1-Cup brown sugar 1-Cup white sugar 2-Teaspoon hot water 2 Cups chocolate chips (semi-sweet) 2- Teaspoon vanilla essence ½-Teaspoon salt 1-Teaspoon baking soda |
| Nutrition | 3.6g Protein 165.8 mg Sodium 38.9g Carbohydrates 35.8mg of Cholesterol 15.6g Fat |
Cooking Process:
- Preheat the oven to 175- degrees C. Mix well (brown sugar, butter, white sugar) until combined; beat eggs with it and add vanilla.
- After that, melt 1- teaspoon baking soda in 2 teaspoons hot water.
- When ready, the batter gives salt in it. Swirl in nuts, chocolate chips, and flour. Take a large pan and drop batter into it. It takes time 10 minutes to bake in the preheated oven.
- When the edges of the cookies look brown, then you have to understand that your cookies are now ready.
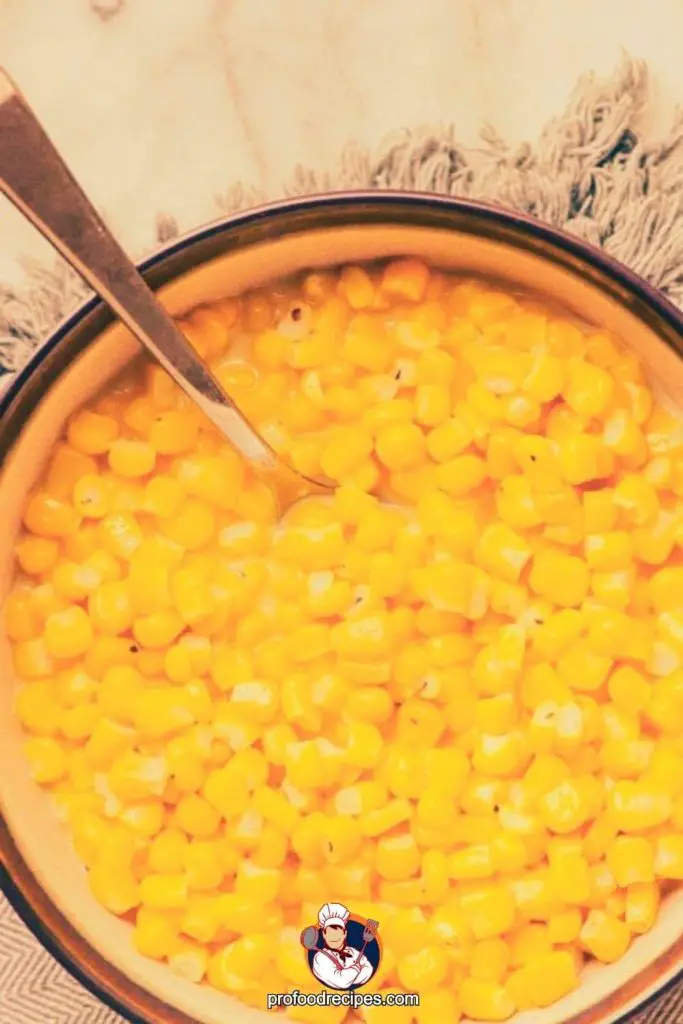
6. Butter Corn
This is one of the easiest snacks to make for a birthday party. You can make this quick, and Kids love to eat this tasty food.
| Ingredients | 2- Tablespoon butter 3- Tablespoon ground black pepper 2- Tablespoon grated cheese (it’s optional) 3- Cups sweet corn kernels 1-Tablespoon lemon juice ½-Teaspoon salt |
| Nutrition: | 3.4g Protein 67.4mg Sodium 150g Energy 6.2g Fat 23.8g Carbohydrates 2.5g Fiber 0 mg Cholesterol |
Cooking Process:
- Take a non-stick pan, put it on the stove, melt the butter on it. When the butter is melted properly, add pepper, salt, cheese, corn, and cook it for 2 minutes on medium flame.
- After 2- minutes, take out the pan from the stove and add some lemon juice. It takes 13 minutes to cook. Serve butter corn immediately after cook.
7. Cheese Cubes
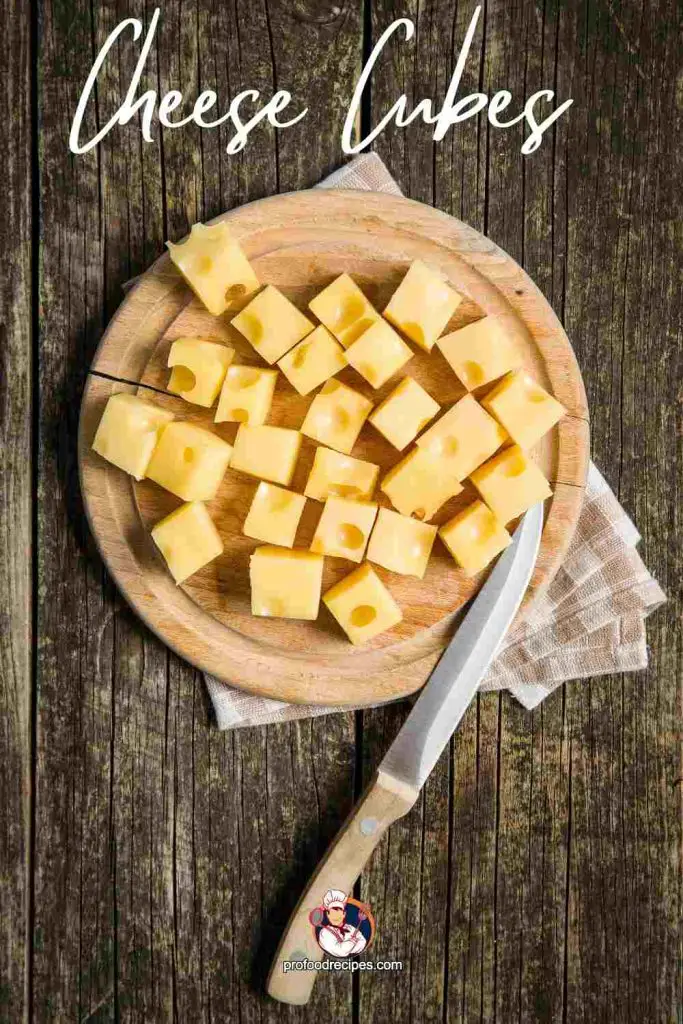
Cheese cubes, available in a wide range of sizes, are convenient bite-sized cheese pieces. Although delicious, cheese bites may also be used to make a delicious cheese board when accompanied by fruits, crackers, or cured meats. Adding cheese cubes to pastas, salads, and omelets is a great way to boost the flavor and texture of such foods.
Process:
- To prepare cheese cubes, take a block of your preferred cheese. This may be done with cheddar, mozzarella, or any other variety of cheese.
- Cut the cheese into cubes of any size you choose, and soon, you’ll have a delicious handmade snack, an addition to salads, or a cheese buffet.
8. French Fries
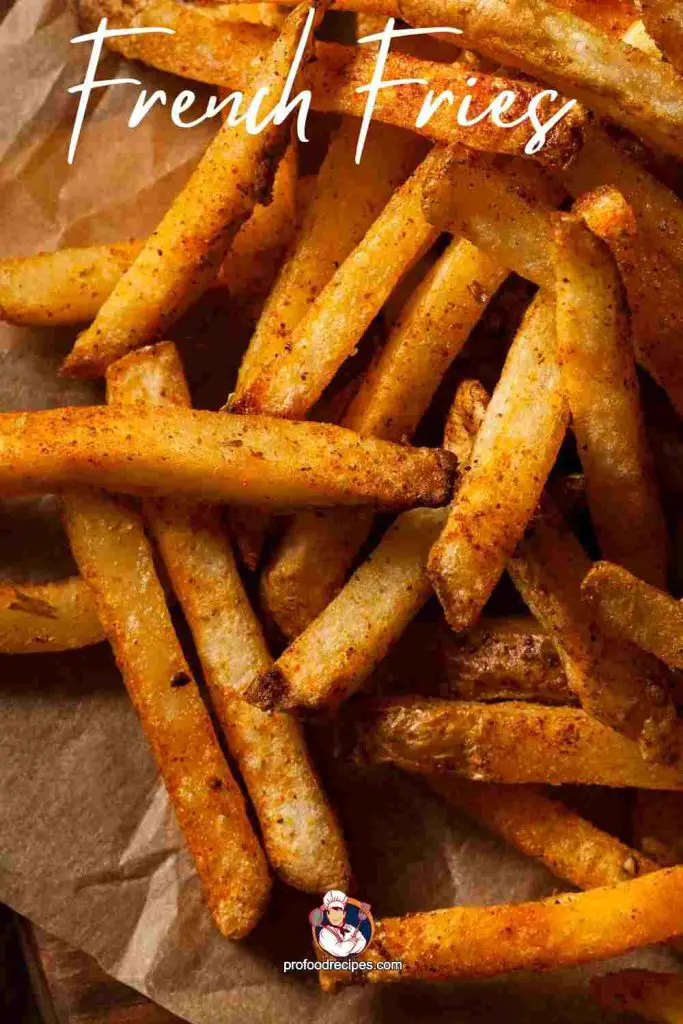
French fries are a renowned and enduring side dish made from deep-fried potato strips or chunks, sometimes called “fries” or “chips” in various locales. Despite its name, French fries are said to have started in Belgium in the late 17th century. They rose to fame in France before eventually becoming global.
Process:
- Potatoes are traditionally peeled, chopped into strips, and then deep-fried in oil until golden brown and crispy to produce French fries (although some like to keep the skin on for extra texture and flavor).
9. Mini Sandwiches
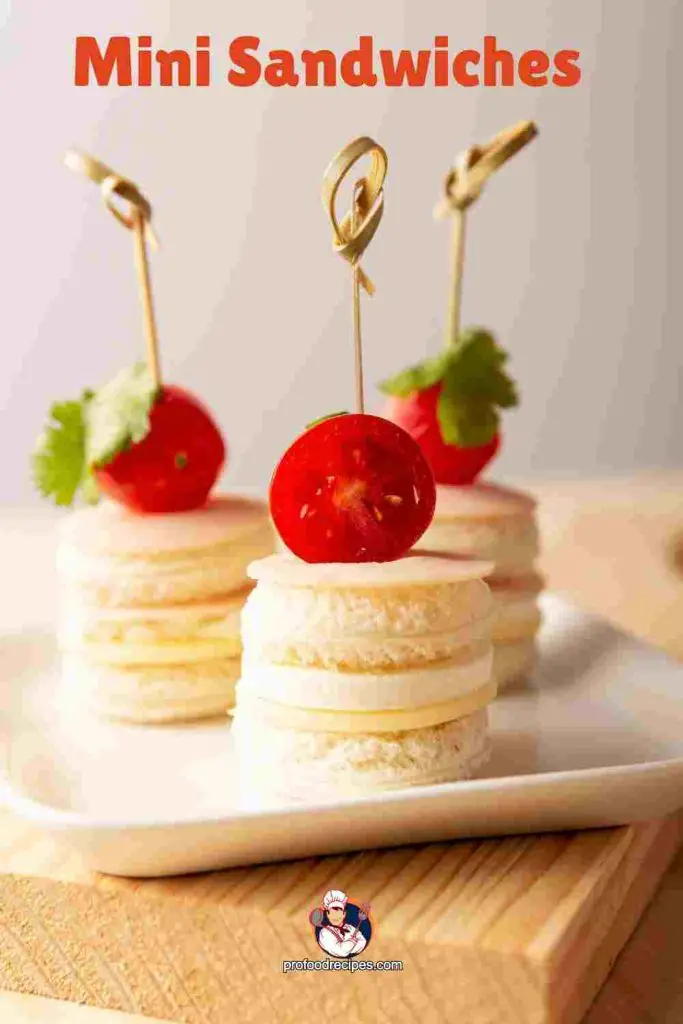
The wonderful bite-sized variants of the traditional sandwich are mini sandwiches, sliders, or finger sandwiches. Mini sandwiches can be made in various ways to accommodate varied tastes and dietary requirements, such as little burgers, tea sandwiches, or miniature subs.
Mini sandwiches are a delicious and portable way to experience the taste of a full-sized sandwich in a small container, whether they are served warm or cold.
Process:
- Start with a few pieces of bread or a little buns. Add your preferred fillings, such as deli meats, cheese, vegetables, and sauces.
- Put them together to create delicious bite-sized treats.
10. Fruit Skewers

A colorful and energizing way to take advantage of nature’s delicious bounty is with fruit skewers. These vibrant concoctions are a popular option for parties, birthdays, celebrations, and even daily eating since they contain a variety of fresh fruits skillfully strung onto skewers.
They offer a delightful mix of flavors and textures, from the crispness of apples and pears to the juiciness of strawberries, pineapples, and grapes.
Process:
- You can choose a variety of fresh fruits, such as strawberries, melon, pineapple, grapes, and kiwis.
- Cut them into bite-sized pieces, then arrange them attractively on wooden or metal skewers.
11. Cowboy Caviar

Cowboy caviar, often called Texas caviar, is a popular Southwestern delicacy recognized for its bright colors and robust Tex-Mex tastes. Black beans, maize, bell peppers, tomatoes, red onion, jalapeno peppers, and cilantro are usual components, along with a tangy sauce.
This vibrant combination may be used in several ways, such as a dip with tortilla chips, a side salad with grilled meats, or a topping for tacos and burritos.
Process:
- To prepare Cowboy caviar, combine ingredients like black beans, corn, bell peppers, tomatoes, red onions, jalapeno peppers, and fresh cilantro by cutting or slicing them.
- Make a flavorful dressing by combining lime juice, olive oil, chopped garlic, and spices in a separate bowl.
- Mix the chopped ingredients with the dressing and refrigerate the combination for at least a few hours and overnight to let the flavors combine.
- The result is a colorful and flavorful Southwestern-inspired salsa-like dish, perfect for dipping with tortilla chips, as a side salad, or as a topping for various Tex-Mex dishes.
Drinks for the Birthday Party
Drinks are also an essential part of 1st birthday food ideas. To make your baby’s 1st birthday party special, here are 2- welcome drinks are given below.
12. Pink Lemonade

This non-alcoholic drink is the best for the kids at the birthday party.
| Ingredients | 4-Cups cold water ½-Cup cranberry juice 3-Cups lemon juice (20 lemons squeezed) 2-Thinly sliced lemons (for garnish) 4-Cups ice 2-Cups of sugar |
| Nutrition facts (for 1 can) | 0.5g Protein 1.5g Fat 8.7mg Sodium 106.5g Carbohydrates 165.7mg Potassium |
Preparing Process:
- Take a large juice container, pour the lemon juice into it. Dissolved the sugar in this juice, give cranberry juice and 4 cups cold water into this container; stir it continuously to combine it.
- At last, add sliced lemon and ice for serving.
13. Vanilla Milkshake
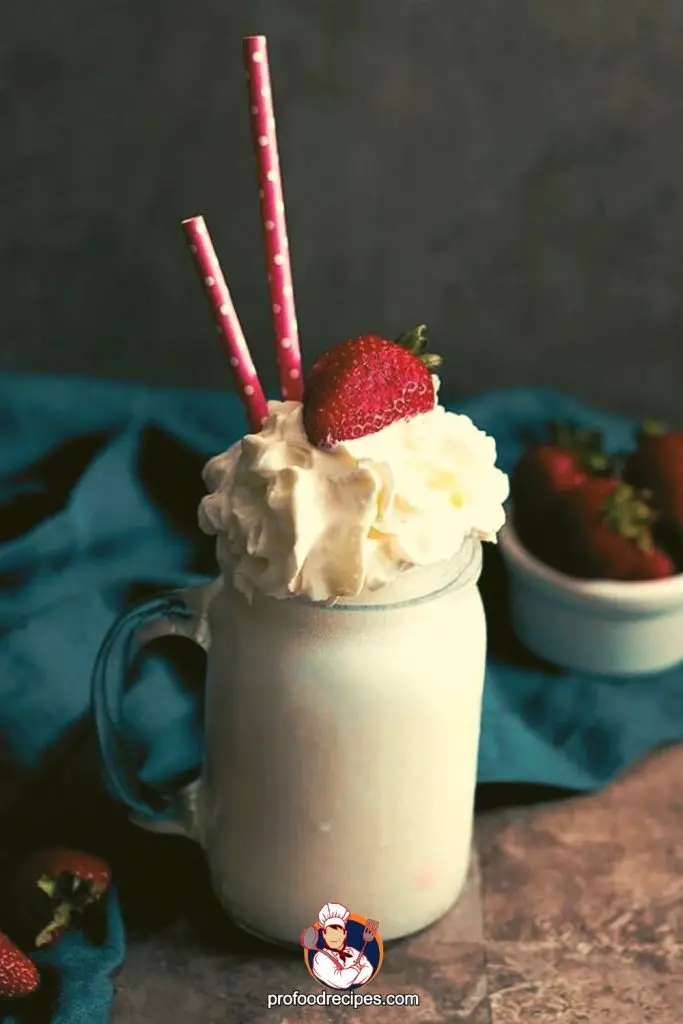
This creamy and smooth milkshake will be the kids’ favorite one drink.
| Ingredients | 4- Drops of vanilla essence Cup vanilla ice cream 1-Teaspoon sugar (if needed) 4- Cup cold milk |
| Nutrition | 12g Protein 26g Fat 89g Carbohydrate |
Preparing Process:
- Blend the ingredients all together with sugar, milk, and vanilla essence. After that, add ice cream and blend again to make it creamy. It takes 7 minutes to prepare.
- Serve in the glass.
14. Red Velvet Shot
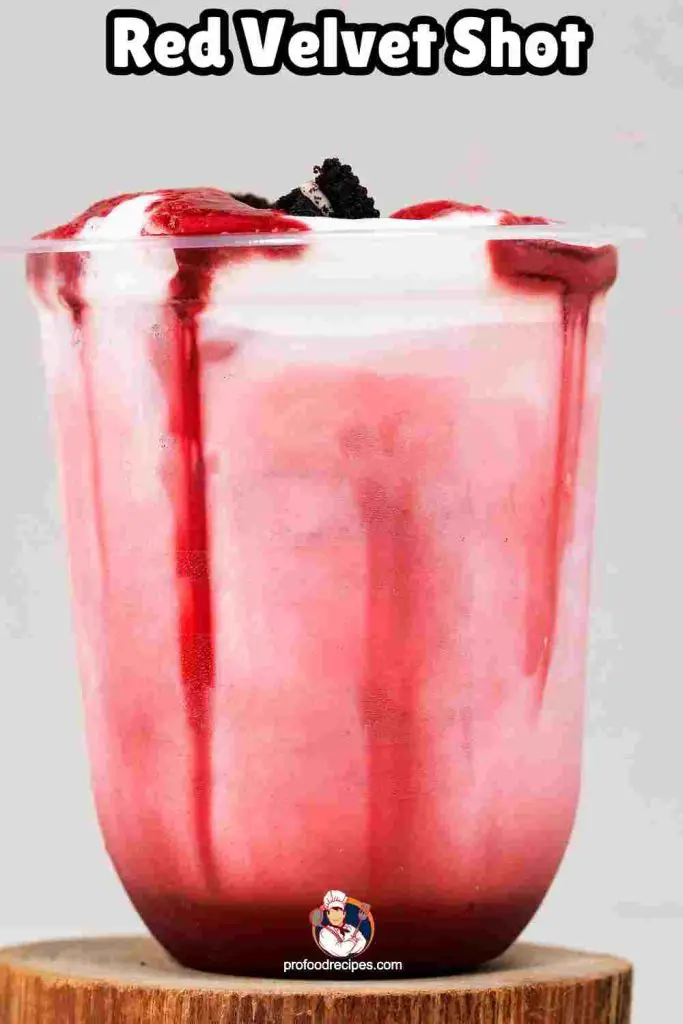
Drink a non-alcoholic Red Velvet Milkshake and experience the classic red velvet cake’s decadent flavor and smooth texture. Vanilla ice cream, red velvet cake mix, and cocoa powder combine in this delectable milkshake to create a rich and decadent dessert in a glass.
Ingredients
- 1/4 cup red velvet cake mix (dry)
- 2-3 tablespoons powdered sugar (adjust to taste)
- 2 tablespoons cocoa powder
- 1 teaspoon vanilla extract
- Whipped cream
- 1 cup whole milk
- 2 cups vanilla ice cream
- Maraschino cherry (for garnish, optional)
- Red velvet cake crumbs or chocolate shavings
Process:
- Add milk, vanilla extract, cake mix, cocoa powder, ice cream, and powdered sugar in a blender to prepare a red velvet shake. Process until smooth and creamy or until all the ingredients are incorporated.
- Taste the milkshake and add extra powdered sugar if you think it needs it. Extra sugar can be blended in by re-blending for a few seconds.
- Fill up some glasses with the red velvet milkshake.
- Red velvet cake crumbs or chocolate shavings can be used as a garnish for the whipped cream on top of each milkshake.
- Add a maraschino cherry on top for that traditional milkshake appeal if you like.
15. Color Changing Lemonade
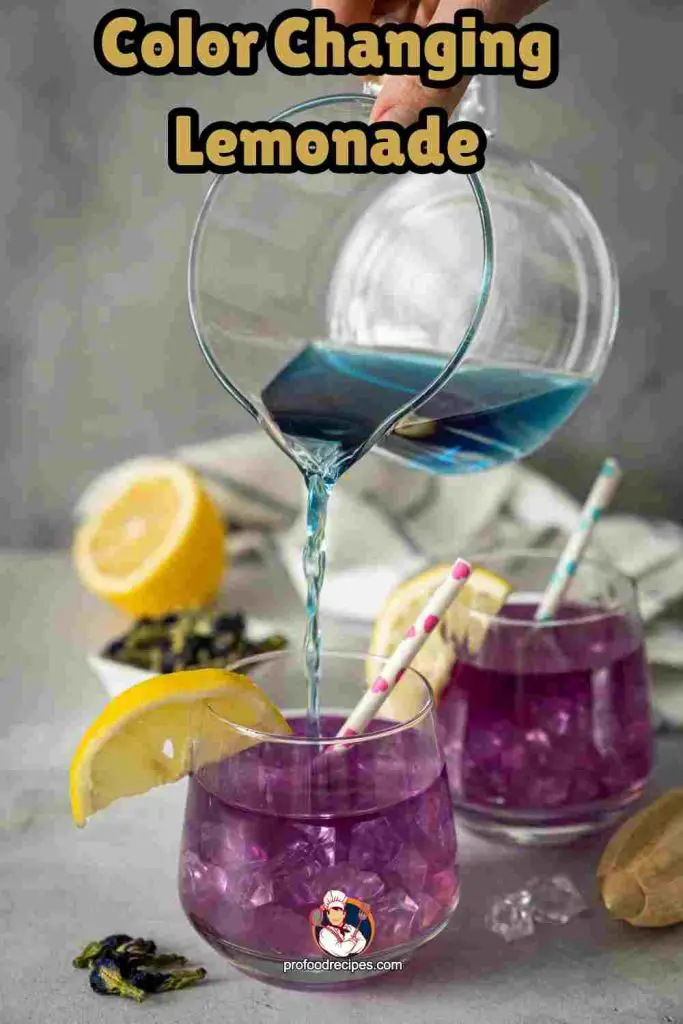
Lemonade that changes color as you sip it is a visually appealing and entertaining beverage. One such type is butterfly pea flower tea, whose name comes from the fact that it changes color when exposed to acids like lemon juice. Make your color-shifting lemonade with this easy recipe.
Ingredients
- Ice cubes
- 1/2 cup lemon juice- Freshly squeezed
- 2 tablespoons dried butterfly pea flowers
- 2 cups water
- Lemon slices or mint leaves for garnish
- 1/2 cup sugar (adjust to taste)
Process:
- Prepare a cup of tea from butterfly pea flowers. The dried butterfly pea blossoms can be prepared by bringing 2 cups of water to a boil in a teapot or other heat-safe vessel. Around five to seven minutes can pass as the flowers soak in the hot water. A gorgeous blue tea will result from this.
- Upon reaching room temperature, filter the butterfly pea flower tea into a pitcher.
- Sugar and freshly squeezed lemon juice should be combined in a separate container. Lemon syrup can be made by stirring in sugar until it dissolves.
- After the butterfly pea flower tea has cooled, fill cups halfway with ice cubes and pour in the blue tea.
- The lemon syrup can be added slowly over the back of a spoon or drizzled down the side of the glass.
- The acidic lemon juice will cause the blue tea’s color to gradually shift to purple or pink when it comes into touch with the two ingredients. You can change the hue by adjusting the amount of lemon syrup used.
- Give the lemonade a quick toss to combine the ingredients.
- As a garnish, you may use mint leaves or lemon slices.
- As the color of your lemonade changes, serve it right away to delight your taste senses and your eyes.
16. Raspberry Lemonade

This raspberry lemonade has just the right amount of tang from the lemons and sweetness from the raspberries, making it the ideal beverage for warm weather or celebrations. It’s great fun for all ages, not just youngsters.
Customize the sweetness to your liking by adjusting the sugar in the recipe. Cheers to a refreshing and flavorful beverage!
Ingredients
- 1 cup granulated sugar (adjust to taste)
- 6 cups cold water
- Ice cubes
- 1 cup freshly squeezed lemon juice
- Fresh mint leaves and lemon slices (for garnish)
- 1 cup fresh raspberries
Process:
- Put the fresh raspberries in a blender with half a cup of granulated sugar.
- The raspberries should be blended until smooth. If you want to avoid having any seeds in the finished product, pass the mixture through a fine-mesh sieve. to depart.
- Squeeze the lemons into a large pitcher and add the juice and the rest of the sugar. Give it a vigorous swirl to make sure the sugar dissolves.
- The jar’s raspberry puree must be added to the lemonade in the pitcher. Toss it around to combine the ingredients.
- Stir frequently; gradually add the cold water to ensure everything is mixed.
- Let the pitcher chill for at least two hours in the fridge. This encourages the mingling of flavors.
- Get some ice cubes ready and pour some raspberry lemonade into glasses.
- Add a sprig of fresh mint and a slice of lemon to the rim of each glass for an extra taste boost and a lovely presentation.
17. Pink Drink

Strawberry, coconut milk, and iced tea perfectly harmonize Starbucks’ Pink Drink, a lovely tropical-inspired beverage. This pink and visually appealing beverage is ideal for warm weather or craving something fruity and light.
Starbucks Pink Drink Recipe:
Ingredients
- 1 cup of ice
- 1/2 cup of coconut milk
- 1/2 cup of freeze-dried strawberries
- 1-2 tablespoons of simple syrup or sweetener (adjust to taste)
- Few fresh mint leaves (for garnish)
- 1/2 cup of Starbucks Passion Tango Iced Tea (or a fruity herbal tea of your choice)
- Fresh strawberry slices (for garnish)
Process:
- Use a blender to reduce freeze-dried strawberries to a powder if you want to use them. Make a smooth puree of fresh strawberries. You can strain your puree if you don’t want any seeds.
- In a cocktail shaker or sizable glass with ice, muddle the coconut milk, simple syrup, coconut iced tea, and strawberry puree. Shake or mix the ingredients vigorously to combine them.
- Pour the pink drink into a serving glass filled with ice.
18. Frozen Mudslide
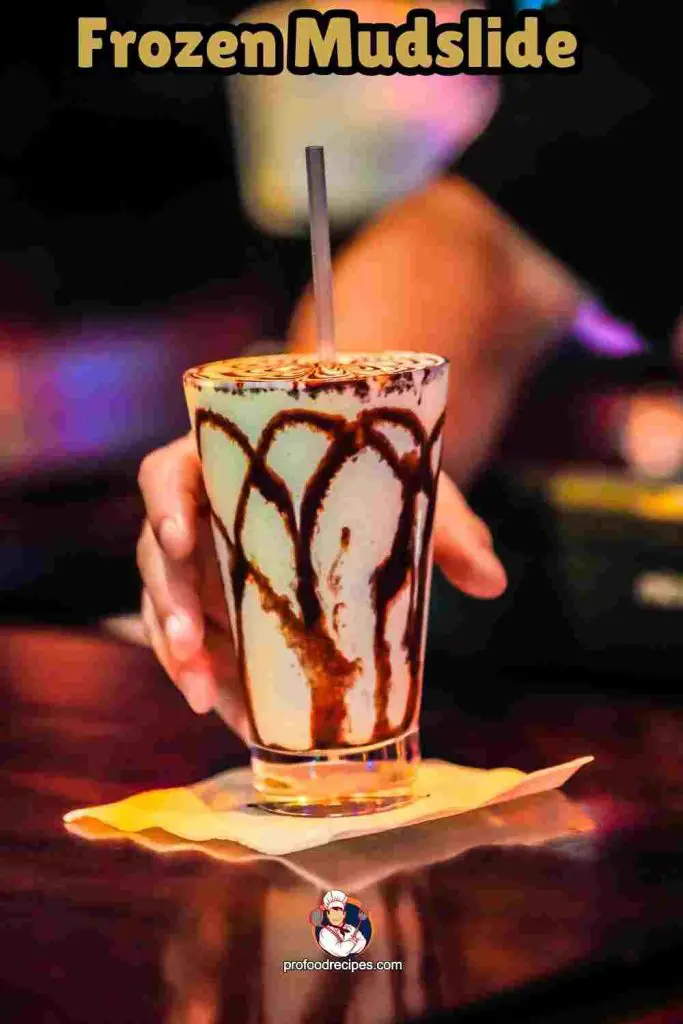
The smooth flavors of vodka, coffee liqueur, Irish cream liqueur, and chocolate liqueur come together in a Frozen Mudslide to create a decadent adult dessert cocktail.
Ingredients
- 1 oz (30 ml) chocolate liqueur
- 1 oz (30 ml) Irish cream liqueur
- Chocolate shavings or cocoa powder (for garnish, optional)
- 1 oz (30 ml) coffee liqueur
- 2 oz (60 ml) cream or half-and-half
- Whipped cream (for garnish)
- 2 cups ice cubes
- 1 oz (30 ml) vodka
Process:
- Whisk together chocolate, ice, coffee, vodka, and Irish cream in a blender. The next step is to fill the blender with ice.
- Blend the ingredients briefly until a smooth, creamy mixture is achieved. Adding more cream or half-and-half will make it thicker.
- Strain the liquid into a cold glass after it is smooth.
- To make it seem sophisticated, top the whipped cream with cocoa powder or chocolate shavings.
- Use a large spoon or a straw to serve right away.
19. Chocolate Martini

A Chocolate Martini is a rich and delectable cocktail that blends chocolate liqueur, vodka, crème de cacao, and cream for a smooth and velvety taste. It’s like a chocolate confection in liquid form, served in a martini glass. This cocktail is made for you if you love chocolate’s rich, velvety flavor.
Ingredients
- 1 1/2 oz (45 ml) chocolate liqueur (e.g., Godiva)
- 1 1/2 oz (45 ml) vodka
- 1 oz (30 ml) crème de cacao (dark or white)
- Chocolate shavings or cocoa powder (for garnish, optional)
- 1 oz (30 ml) heavy cream or half-and-half
- Ice
Process:
- Shake your drinks with ice in the container. Put the crème de cacao, heavy cream, or half-and-half in a cocktail shaker and add the chocolate liqueur.
- Shake the mixture vigorously until the components are evenly distributed, and the temperature has dropped.
- To serve, strain the liquid into a martini glass filled with ice.
- You may add chocolate chips or cocoa powder for extra flavor to serve.
20. Espresso Martini

Elegant and energizing, an Espresso Martini mingles the robust flavors of freshly brewed espresso with the silky smoothness of vodka and the sweet tang of coffee liqueur. It’s loved by coffee connoisseurs and cocktail fans for its balanced intensity and sweetness.
Ingredients
- 1 oz (30 ml) coffee liqueur (e.g., Kahlúa)
- Espresso beans (for garnish, optional)
- 1 oz freshly brewed espresso Cold
- Ice
- 1/2 oz (15 ml) simple syrup
Process:
- Prepare an espresso and set it aside to cool. Espresso made in a coffee maker or a French press can also be used and chilled in the fridge.
- Pour the coffee liqueur, cold espresso, and simple syrup into a cocktail shaker.
- Shake hard to create a frosty, cold drink. This aids in producing a foamy cap on top of the martini.
- In a martini glass with ice already in it, strain the liquor.
- To add visual appeal, sprinkle coffee beans or espresso beans on top and serve.
Dinner or Lunch Items
21. Cheese Pizza
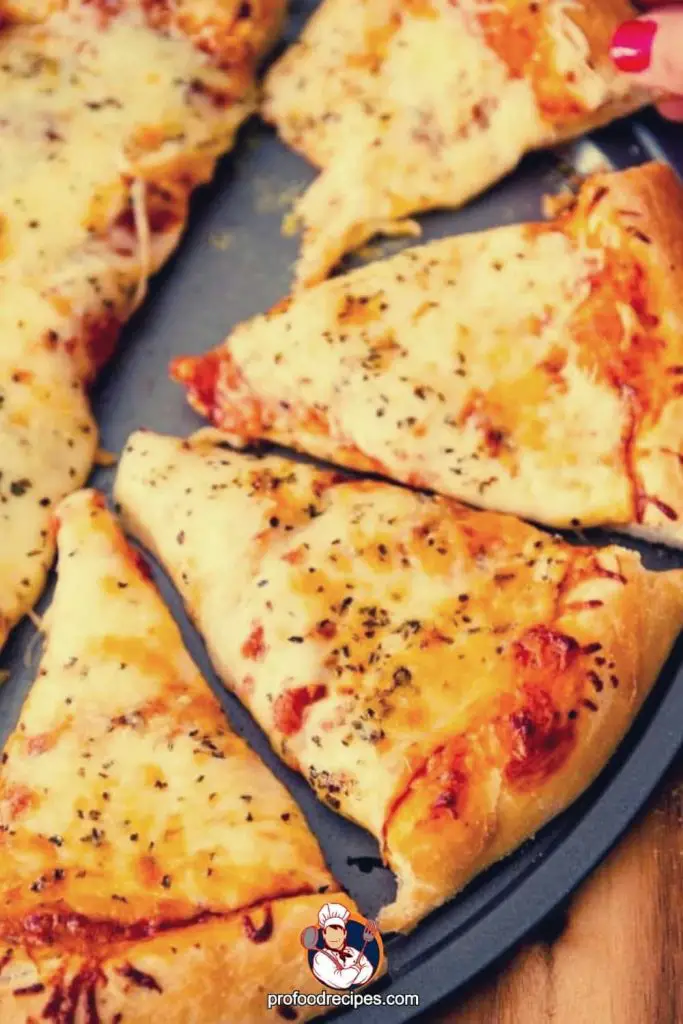
This is a tasty pizza with a lot of cheese that everyone loves to bite. This pizza can be standard food for dinner time at the birthday party. A pizza is a kind of food that is everyone’s favorite.
| Ingredients | 1-cup lukewarm water 1-cup flour teaspoon olive oil 1-Tablespoon sugar ½-Teaspoon salt 1-Teaspoon dry yeast 1-Tablespoon tomato sauce or tomato paste 1-tablespoon chopped fresh basil 8- Beef strips, crumbled and cooked (you can also use chicken) 7- Sliced cheese 4 Cups fresh mozzarella cheese (also can be used cheddar cheese) ¼ -Teaspoon oregano (it’s optional) |
| Nutrition facts (for 1- slice) | 36g Protein 93 mg Cholesterol 50g Carbohydrate 685 Calories 1503mg Sodium |
Baking Process:
- Take a plastic bowl; mix all the ingredients (sugar, lukewarm water, yeast) together. Keep it aside for 15 minutes to bloom.
- After 15 minutes, add 1 cup of flour into it and make the pizza dough; Dab 1 teaspoon olive oil over the dough, and let rest for 40 minutes.
- Spend 40 minutes, knead the dough, and spread it on the pizza pan. Spread the pizza sauce on prepared pizza dough. Distribute the mozzarella cheese with beef strips. Bake the pizza in the oven at 400°.
- Bake it until the cheese is melted and the crust is golden brown. It took time 35-40 minutes.
Notes: Before spread pizza on the pan, make sure that you spray the pan with olive oil or vegetable oil; this can help to avoid sticking of crust.
22. Mini Mac and Cheese Hot Dogs
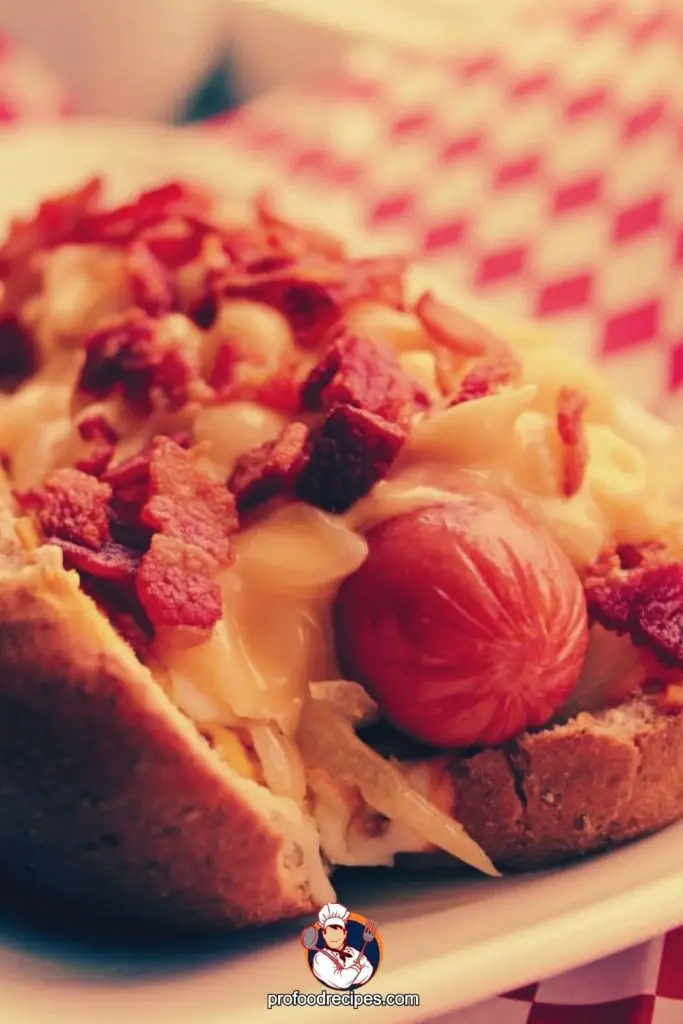
This tasty dish can enjoy everyone as a dinner item at a birthday party.
| Ingredients | 12-Bun-length beef hot dogs 16-Ounces of frozen bread dough 2- Tablespoon chopped onion ¼-Teaspoon pepper Package cheese and macaroni dinner mix ½-Cup crumbs of bread Tablespoon olive or vegetable oil ¼-Teaspoon salt |
| Nutrition (1- appetizer) | 6-g Protein 446mg Sodium 12g Fat 18g Carbohydrate 198 Calories |
Baking Process:
- Put the dough for 15-20 minutes at room temperature to make it soft. Make 3 inches long mini bun. Use greased plastic wrap to cover it, bake buns until it turns golden brown.
- Take a baking pan mix the remainder of all ingredients onion, salt, pepper, oil with bread crumbs. Bake it in the oven at 350°. It took time 5-7 minutes to a golden brown.
- Make macaroni following the package instructions and cook hot dogs. Before serving, cut the hot dogs into half; fill it with the cheese and macaroni. To decorate, sprinkle some toasted crumbs over it.
23. Taco Dip Platter
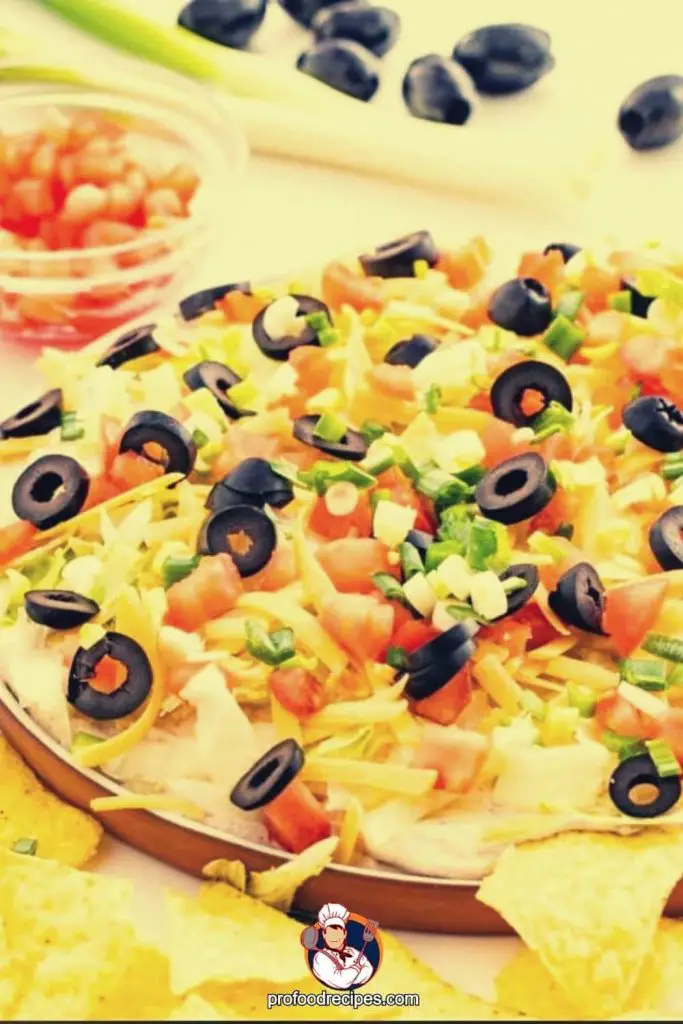
From our first birthday food ideas, this traditional colorful dish can be the best choice for dinner. This is a good dish with olives, tomatoes, lettuce, and cheese.
| Ingredients | 2-Cups hot cooked rice 15-Ounces beans 15-Ounces tomato paste 14-1/2-Ounces diced tomatoes 15-Ounces tomato puree Package corn chips Large chopped onion ½-Teaspoon garlic powder Tablespoon chili powder Teaspoon salt Teaspoon ground cumin 2-Pounds of ground beef For Toppings Medium shredded lettuce Medium chopped onion Medium chopped tomatoes ¼-Ounces olives 2-Cps cheddar cheese |
| Nutrition | 27g Protein 1200 mg Sodium 522 Calories 47g Carbohydrate 56mg Cholesterol 24g Fat (saturated fat 9g) |
Cooking Process:
Take a medium-sized bowl to mix 7- ingredients and cook the meat until the meat is ready. Add the ingredients with the prepared meat and cover for a maximum of 2 hours.
Heat the beans; take one plate, and put on the meat mixture, rice, corn chips, tomatoes, onion, and lettuce.
24. Pasta with Meatballs

This is the proper tasty food for the guest at the birthday party dinner. It is a simple and delicious dish.
| Ingredients | 2- eggs or 1- large egg 42-Heaped teaspoon Dijon mustard 12-Cream crackers 1-Tablespoon oregano 500g Minced beef Dried red chili 1-Teaspoon black pepper Spring’s chopped rosemary Bunch fresh basil Cloves of garlic Olive oil (based on your need) 1-Tablespoon vinegar Onion 400g Dried pasta (can be used spaghetti also) Italian cheese 2 x 400 g Tin of plum tomatoes |
| Nutrition (1000grams) | 4.5g Protein 11g Carbohydrate 315mg Sodium 7mg Cholesterol 201mg Potassium 4g Total fat |
Cooking Process:
- Smash the crackers with a tea towel, then put them into a bowl. Add the ingredients into the bowl (chopped rosemary, minced meat, oregano, mustard, black pepper, egg, salt). Mix it well; to mix all the ingredients well, you can use a whisk here.
- Make the meatballs with this mixture. Take place; put each meatball on it. To firm the balls, you have to keep the balls in the freeze.
- Heat the frying pan with 2- tablespoons of oil; cook the onion on the frying pan until its golden brown. Then put garlic, basil leaves, chili, tomatoes, season, and balsamic vinegar. Stir it continuously to cook properly.
- Heat 1 tablespoon of oil on a new frying pan. Cook the meatballs for around 10-12 minutes, until there is no longer pink in the meatball.
- Cook the pasta according to the package instructions. Put the cooked pasta on the large plate, then spread half tomato sauce over it. Attach meatballs, reserved basil, and cheese on the top.
25. Party Bread
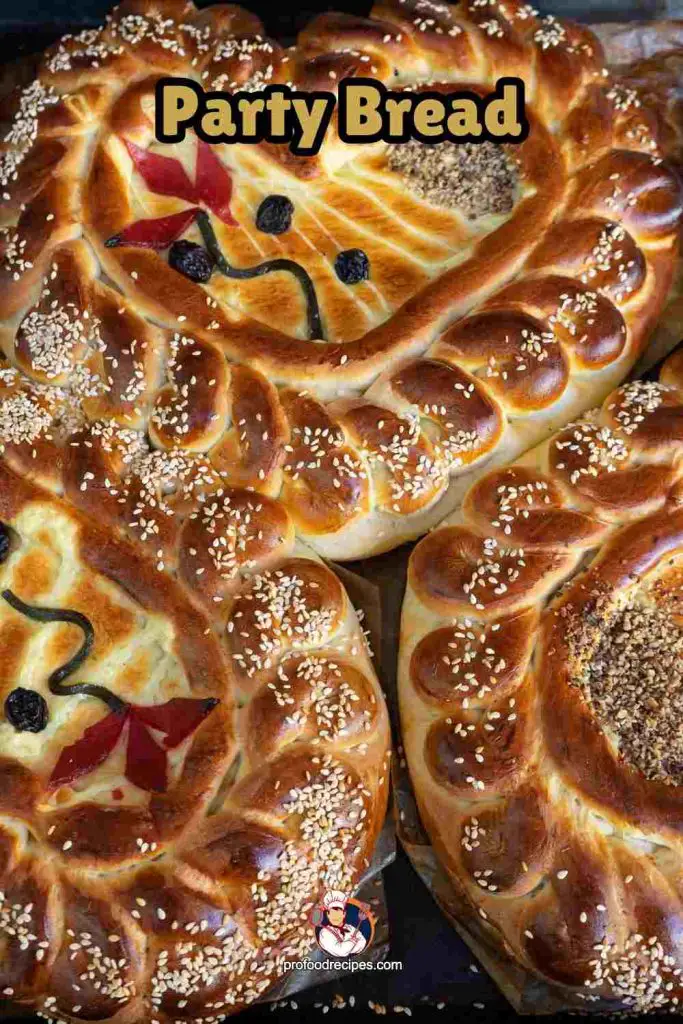
Cheesy pull-apart party bread is the perfect crowd-pleaser, offering a combination of warm, gooey cheese and garlic butter in a convenient, shareable format.
Party bread can take many forms, from simple garlic bread to more elaborate stuffed and pull-apart bread creations.
Ingredients
- 2 cups shredded cheese (e.g., cheddar, mozzarella, or a blend)
- 1 round loaf of bread (e.g., sourdough or Italian)
- 2-3 cloves garlic, minced
- 2 tablespoons fresh parsley, chopped (optional)
- Salt and pepper to taste
- 1/2 cup (1 stick) unsalted butter, melted
Process:
- Preheat your oven to 350°F (175°C).
- On a flat cutting surface, position the circular loaf of bread. Make a grid pattern by cutting at an angle with a serrated knife about an inch apart in one direction and then the other. If you want your bread to stay intact after cutting it, avoid cutting through the bottom.
- In a bowl that can be used in a microwave, melt the butter. Combine the minced garlic, chopped parsley, and other spices to taste.
- Open the bread slices gently and spread the grated cheese over them. Spread the cheese around generously.
- Use a spoon to evenly distribute the melted garlic butter on the bread, ensuring to get it into the cracks.
- Close up the loaf in aluminum foil, but leave the top open.
- Spread the cheese evenly over the bread and wrap it in foil. Bake for 15 to 20 minutes, or until the bread is crusty and the cheese has melted.
- Unwrap the cheesy pull-apart bread carefully and place it on a serving plate. Guests can help themselves by tearing off warm slices of the cheesy bread you serve them.
26. Baked Wontons
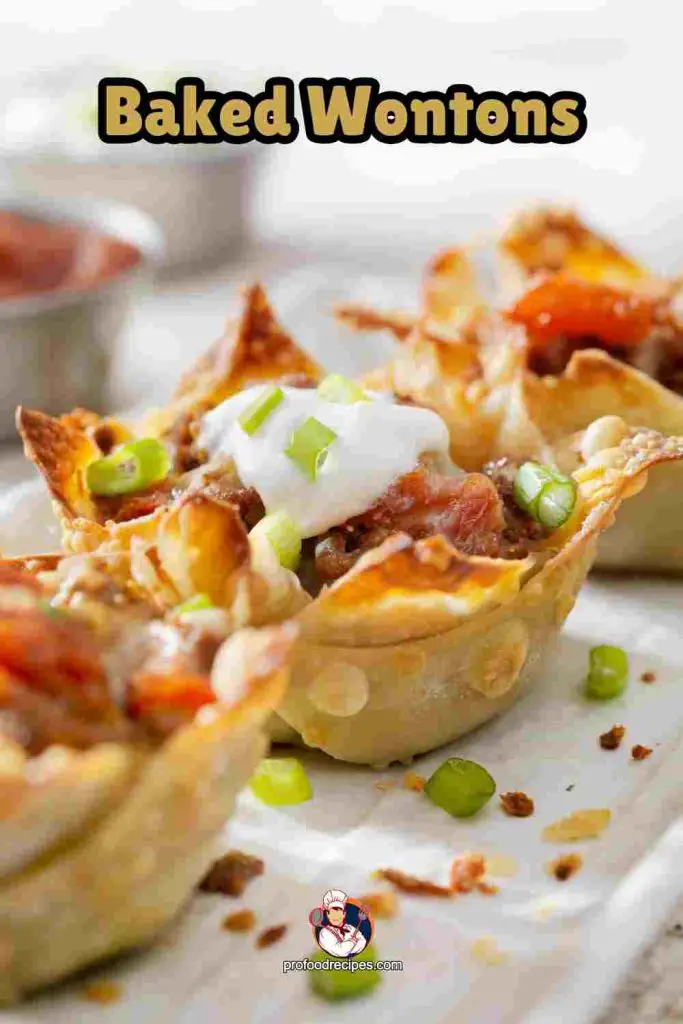
Try making them in the oven if you want a healthy alternative to traditional deep-fried wontons. They have a crispy shell and can be filled with various delicious ingredients.
These baked wontons are great as an appetizer, snack, or party meal, whether you fill them with traditional pork or a vegetarian choice. They may be tailored to suit your needs and look great at any event. The crispy texture and salty flavor make for a delicious combo.
Ingredients
- Wonton wrappers
- Soy sauce
- Minced garlic
- Filling of your choice (e.g., ground beef, vegetables, or a combination)
- Sesame oil
- Minced ginger
- Cooking spray ( for brushing)
- Green onions, finely chopped (optional)
- Salt and pepper to taste
Process:
- Put the filling ingredients you like best into a bowl. Ground beef, soy sauce, sesame oil, garlic, ginger, green onions, salt, and pepper are all traditional ingredients for a meat filling.
- Place a wonton wrapper flat on a dish. Place a small heaping teaspoonful of the filling in the middle of the wrapper.
- Use a finger or a brush to lightly moisten the package’s rims with water. Just construct a triangle out of the wrapping and push the points together to seal.
- Preheat your oven to 375°F (190°C). Place the assembled wontons on a lightly greased baking sheet lined with parchment paper.
- Separate them so they can’t stick together. Before baking, help the wontons get crispy by lightly spraying them with cooking spray or brushing them with oil.
- Bake the wontons at 400 degrees for 12-15 minutes to make them crispy.
- When the wontons are done baking, take them from the oven and set them aside to cool for a few minutes before serving.
- Serve them with your favorite dipping sauce, soy sauce, sweet chili sauce, or something you whipped up in the kitchen.
27. Barbecue Wings

Chicken wings are seasoned, cooked, then covered with barbecue sauce to create barbecue wings, also known as BBQ wings. They are a must-have for every party as an appetizer or a main dish.
Ingredients
- 2 pounds of chicken wings
- 1/2 teaspoon of garlic powder
- 1/2 teaspoon of black pepper
- 1/2 teaspoon of onion powder
- 2 tablespoons of vegetable oil
- 1 cup of barbecue sauce (use store-bought or homemade)
- Optional: cayenne pepper or hot sauce for extra heat (adjust to taste)
- 1 teaspoon of salt
- 1/2 teaspoon of paprika
Process:
- Preheat your oven to 400°F (200°C).
- Whisk together the vegetable oil, black pepper, garlic powder, paprika, onion powder, and salt in a large mixing bowl.
- Before adding them to the marinade, make sure the chicken wings are completely dry by patting them with paper towels. Toss the wings in the spice mixture to coat them thoroughly.
- After giving the chicken wings a quick pat down with paper towels, add them to the marinade and toss so that they are uniformly covered.
- The wings need 45-50 minutes in a preheated oven, during which time they should be turned once. That way, they’ll be well-cooked and crisp on the outside.
- BBQ sauce should be heated in a saucepan over low heat while the wings bake. More cayenne pepper or spicy sauce can be used if more spice is desired.
- When the wings are done baking and have achieved a desired level of crispiness, they should be removed from the oven and placed in a sizable bowl.
- Toss the cooked wings in the warm barbecue sauce to ensure they are uniformly coated. Green onions or chopped fresh parsley would be a nice addition to give them extra flavor.
28. Railroad Pie
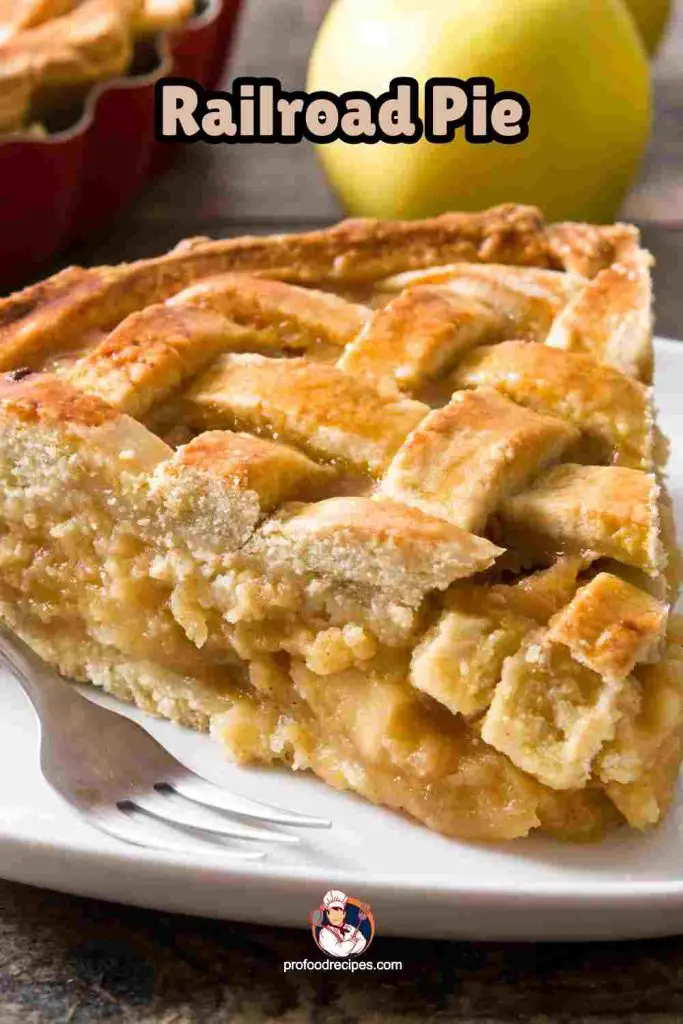
The origins of the American cuisine known as “railroad pie” can be traced back to the early 20th century. It’s a hearty, one-dish meal comparable to a pot pie and got its name since it was commonly cooked for railroad workers. It’s common for this savory pie to have layers of meat, veggies, and even potatoes baked inside a flaky crust.
Ingredients
For the Pie Filling:
- 1 pound ground beef or ground turkey
- 2 tablespoons all-purpose flour
- Salt and pepper to taste
- 1 onion, chopped
- 1 cup beef or vegetable broth
- 1 cup frozen corn
- 2 carrots, diced
- Optional seasonings: thyme, rosemary, or Worcestershire sauce for flavor
- 2 cloves garlic, minced
- 1 cup frozen peas
- 2 celery stalks, diced
For the Pie Crust:
- 2 store-bought pie crusts (or you can make your own)
- 1 egg, beaten (for egg wash)
Process:
- Preheat your oven to 375°F (190°C).
- To get ready, cook the ground beef in a large pan over medium heat. Trim away any extra fat.
- Put chopped onions, minced garlic, carrot, and celery in the skillet. Vegetables need about 7 minutes of cooking time to soften.
- Sprinkle some flour over the meat and vegetables in the pan. Stirring regularly, heat for two to three minutes to get rid of any raw flour taste.
- While stirring frequently, gradually add the beef or vegetable stock and cook until the sauce has thickened.
- Salt, pepper, and other spices or condiments (such as thyme, rosemary, or Worcestershire sauce) are should be add now.
- Add the frozen peas and corn and continue simmering until the veggies are soft and the filling has thickened to a gravy-like consistency, about 5 more minutes.
- Prepare a pie dish or other deep oven-safe dish by lining it with one of the pie crusts.
- Put the prepared filling into the pie. To cover the filling, lay out the second pie shell. Fork-crimp the edges to seal them and prevent air leakage. Cut vents in the top crust to let steam escape and look pretty.
- Apply the beaten egg to the top crust to make it golden brown.
- Bake the pie for 35 to 40 minutes in the oven or until the crust is golden brown and the filling is bubbling.
Take the railroad pie out of the oven and let it cool for a few minutes before cutting into slices and serving.
29. Baked Chicken Tenderloins
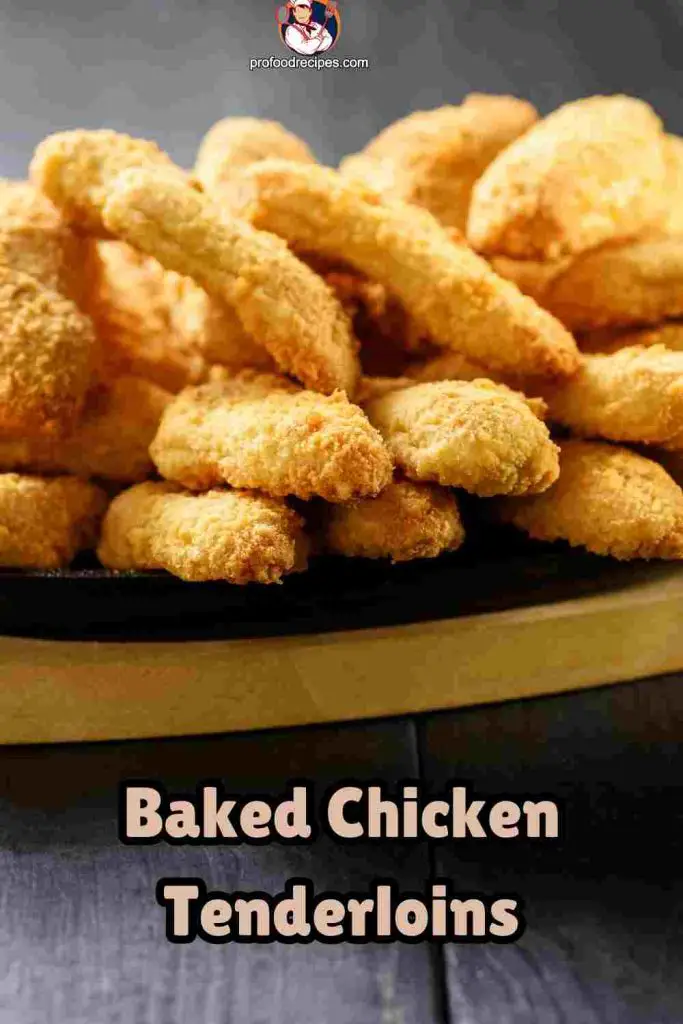
Chicken tenderloins, when baked, are versatile and tasty enough to be used as a main dish, an ingredient in salads or sandwiches, or even a light meal on their own. You may serve this dish with mashed potatoes, steamed veggies, or a fresh salad. In addition, they pair superbly with a dab of your favorite dipping sauce, whether it be ranch, honey mustard, or barbeque.
Ingredients:
- 1 teaspoon garlic powder
- 2 tablespoons melted butter or olive oil (for brushing)
- 1/4 teaspoon black pepper
- 1/2 cup breadcrumbs
- 1/2 teaspoon salt
- 1 pound chicken tenderloins (about 8-10 pieces)
- 1/4 cup grated Parmesan cheese (optional)
- 1 teaspoon paprika
Process:
- Start by preheating the oven to 400 degrees Fahrenheit (200 degrees Celsius). Use parchment paper or gently oil a baking sheet to prevent food from sticking while baking.
- In a small bowl, mix together the breadcrumbs, spices, and seasonings. If using Parmesan, add it now.
- Dip each chicken tenderloin into the breadcrumb mixture, coating them evenly. Make sure the chicken is well coated with the breadcrumbs by pressing them on.
- On the baking sheet, distribute the breaded chicken tenderloins in a single layer.
- Brush the tops of the chicken tenderloins with melted butter or olive oil once they are all placed on the baking pan. In the oven, this helps them brown and get crispy.
- It is recommended to bake the chicken tenderloins for 15–20 minutes or until they are completely cooked on the inside and the outside is golden brown. The chicken needs to be cooked inside out to a temperature of 165°F (74°C).
- Broiling them for the final 1-2 minutes will ensure they are extremely crispy, but be careful not to burn them.
- Once cooked, take the chicken tenderloins out of the oven and give them a moment to rest before serving.
Dessert Ideas
Below are the Most poplar dessert ideas that you can enjoy for a 1st Birthday Party:
30. Brownie Bowls
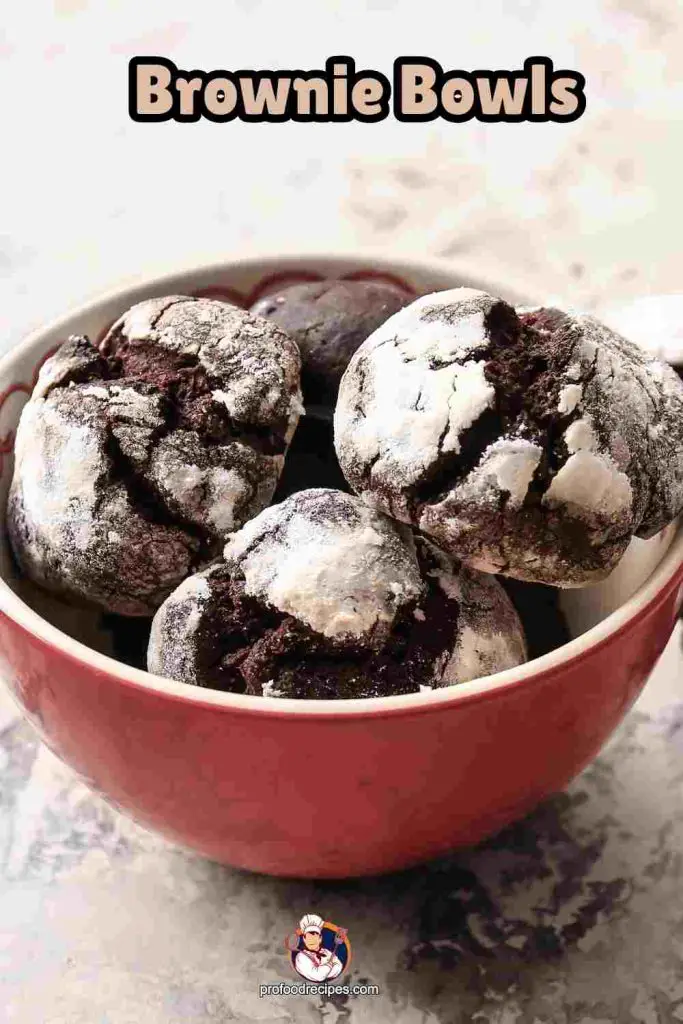
Enjoy the rich, fudgy flavor of brownies in a quirky, edible bowl format with this lovely dessert idea. Common methods for creating these edible bowls involve baking brownie mixture in a bowl-shaped mold, muffin pans, or other appropriate containers.
Ingredients:
- Your favorite brownie batter
Process:
- To bake brownies, preheat the oven as directed in the batter package directions.
- Lightly grease a muffin tin or a brownie bowl pan. If you want individual-sized brownie dishes, use a standard muffin tray instead.
- Get the brownie mix ready like it says in the package.
- The brownie batter should only fill the muffin cups approximately halfway.
- Distribute the batter with a spoon to create a bowl-like shape on the bottom and sides of each cup.
- Use a spoon to spread the batter in each cup so that it reaches up the sides and covers the bottom.
- After baking, remove the brownie bowls from the muffin tray and let them cool for a few minutes before handling.
- When the brownie bowls have cooled, they can be topped with ice cream, whipped topping, fruit, or whatever else your heart desires.
31. Donuts
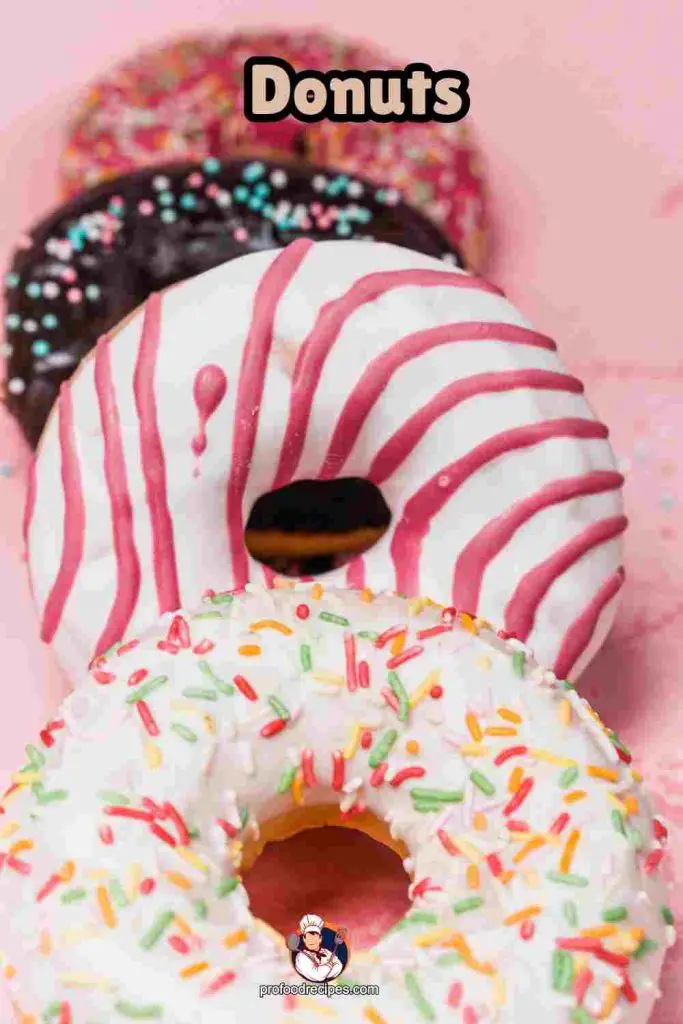
Donuts, often spelled “doughnuts,” are a famous type of pastry that has seen enormous growth in popularity in the last several decades. They may be fried or baked and feature various tastes and toppings.
Ingredients:
- 1 teaspoon salt
- 4 cup warm water (about 110°F or 45°C)
- 2 large eggs
- 4 cups flour, plus extra for dusting
- Powdered sugar glaze, chocolate glaze, or cinnamon sugar for coating ( for glazing)
- 1/4 cup unsalted butter, melted
- 11/4 cup granulated sugar
- 3/4 cup warm milk (about 110°F or 45°C)
- Vegetable oil for frying
- 2 1/4 teaspoons (1 packet) active dry yeast
Process:
- Warm water and yeast should be mixed in a separate basin. Just let it a few minutes to foam up.
- Place the ingredients in a single layer on the baking sheet by combining the melted butter, sugar, salt, and hot milk, in a large basin and whisking until smooth.
- Mix the yeast and milk in a separate bowl.
- Add the eggs and mix well. Mix the dry ingredients into the wet ones gradually until a soft dough is formed.
- The dough has to be kneaded for about 7 minutes on a floured surface until it is smooth and elastic.
- You need to rest the dough rise for 1-2 hours, or until it has doubled in size, by placing it in an oiled basin, covering it with a clean kitchen towel or plastic wrap, and setting it in a warm location.
- When the dough has doubled in size, prepare a surface and roll it out to a thickness of approximately 1/2 inch.
- To shape doughnuts, you can use a standard cookie cutter in the shape of a circle or a specific donut cutter. If you’d want the donut holes to be smaller, you may use a more narrow cutter.
- After cutting out the donuts and doughnut holes, set them on a parchment-lined baking sheet to rise for another 15 to 20 minutes.
- Prepare 350 degrees Fahrenheit (175 degrees Celsius) of vegetable oil in a big, deep saucepan or deep fryer.
- Gently drop the donuts into the heated oil a couple at a time. For the pan to turn golden brown, two to three minutes on each side should be sufficient.
- Remove them from the oil with a slotted spoon, then set them on a dish covered in paper towels to drain.
- Sprinkle or drizzle on your preferred toppings while the doughnuts are still warm. They can be covered in cinnamon sugar or chocolate. Before serving, give the glaze or toppings some time to set.
32. Churros

The Spanish treat churros has gained international fame. Typically served hot and sprinkled with sugar, these pastries are simply deep-fried dough balls. Churros are distinguished by length, thinness, and distinctive ridged or star-shaped patterns. A clean exterior conceals a mushy inside. Hot chocolate or caramel sauce are popular accompaniments to churros.
Ingredients
- 1 cup water
- 3 tablespoons vegetable oil
- 1 teaspoon ground cinnamon (for coating)
- Cinnamon sugar mixture (1/2 cup sugar mixed with
- 2 tablespoons granulated sugar
- 1/2 teaspoon salt
- 2 1/4 cups flour
Process:
- Water, sugar, oil, and salt should all be mixed together in a saucepan. Over medium heat, bring to a boil.
- Remove the pan from the stovetop and, while mixing continually, add the all-purpose flour.
- Preheat the oil to 350 degrees Fahrenheit (175 degrees Celsius) in a big skillet or large pot.
- Fill a piping bag with a star-shaped tip (we used a big open star tip), then place the churro dough inside.
- Strips of dough about 4 to 6 inches in length should be piped carefully into the oil. You can snip them with scissors or slice them with a knife. Take care not to crowd the pan.
- Churros need two to four minutes each side in hot oil to get a golden brown color. Remove them from the oil , then set them on a dish covered in paper towels to drain.
- To ensure an even coating of cinnamon sugar, dip the hot churros in the mixture as soon as they come out of the oven. Prepared to serve.
33. Unicorn Sundaes
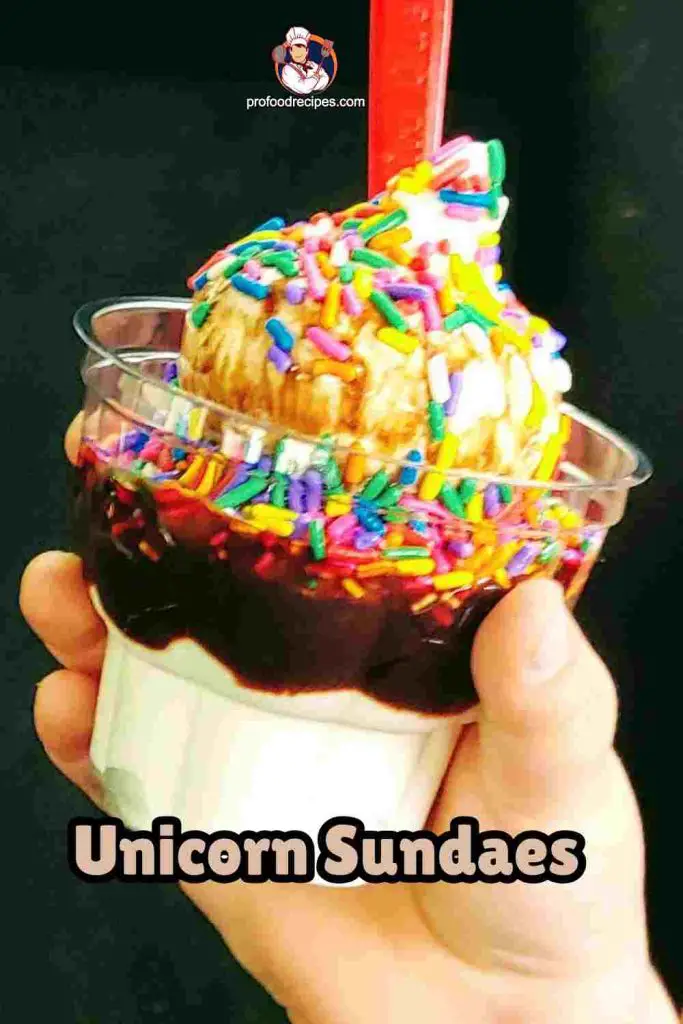
Unicorn sundaes are whimsical and colorful dessert creations inspired by the mythical unicorn. These sundaes typically feature vibrant and fun toppings, pastel-colored ice creams, and a variety of colorful candies and sprinkles. Here’s a basic recipe to make unicorn sundaes:
Ingredients:
- Assorted pastel-colored ice cream flavors (e.g., strawberry, blueberry, cotton candy, mint chip)
- Unicorn horn candies (made from fondant or store-bought)
- Rainbow sprinkles
- Whipped cream
- Edible glitter or edible shimmer dust (optional)
- Unicorn-shaped sprinkles
- Miniature rainbow candy belts
- Waffle cone or sugar cone (for the horn)
- Rainbow-colored marshmallowsEdible flowers (optional)
- Colorful cereal (e.g., Fruity Pebbles or Trix)
Process
- Add scoops of different flavored pastel ice cream in dishes or glasses. To make a multicolored swirl pattern, try using various-sized scoops.
- Spread a heaping spoonful of whipped topping on each serving of ice cream.
- Add a touch of enchantment by topping the whipped cream with rainbow sprinkles and edible glitter or shimmer dust.
- Add the unicorn horn candies or the horns from the waffle cones to the whipped cream.
- Decorate the ice cream with multicolored marshmallows, small candy belts, cereal, and edible flowers.
- Warm the chocolate sauce in a separate bowl from the pink, purple, or blue sauces (such as strawberry, raspberry, or blueberry).
- Create vibrant and creative designs by drizzling these sauces over whipped and ice cream. Serve immediately.
34. Cheesecake Flan
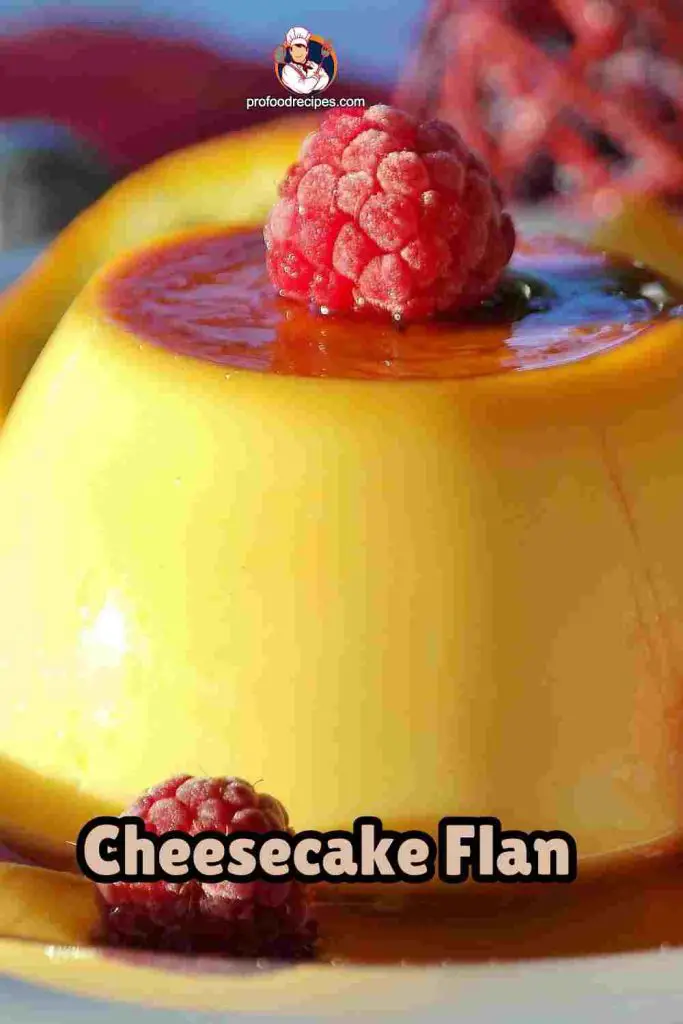
Cheesecake flan, commonly known as “flan de queso,” mixes the smooth texture of cheesecake with the rich, caramelized sweetness of flan to create a delectable delicacy. It’s a typical dessert in Spanish and Latin American cuisines.
Ingredients
- 1 cup granulated sugar
- 1 can (14 ounces) sweetened condensed milk
- 1 can (12 ounces) evaporated milk
- 4 ounces cream cheese, softened
- 4 large eggs
- 1 teaspoon vanilla extract
Process:
- Put the granulated sugar in a pot and cook it over medium until it turns into a golden caramel. If using a flan mold or individual ramekins, pour the caramel in and swirl it around to coat the bottom evenly. Leave it to cool and solidify.
- The eggs, cream cheese, vanilla extract, evaporated milk, , and sweetened condensed milk, are blended until smooth in a blender to form the mixture. Achieving a consistent mixture by mixing.
- When the caramel has set, carefully spoon the flan mixture over the top.
- To make a bain-marie (water bath) for the flan molds or ramekins, place them in a larger baking dish and fill the bigger dish with boiling water.
- To bake the flan, put it in an oven that has been warmed to 350 degrees for 45 to 55 minutes.
- The flan should be refrigerated for at least 4 hours, preferably overnight, once it has come to room temperature.
- To serve, flip the flan onto a serving tray so that the caramel may drizzle down the sides. Enjoy your creamy Cheesecake Flan!
35. Ice Cream Tacos
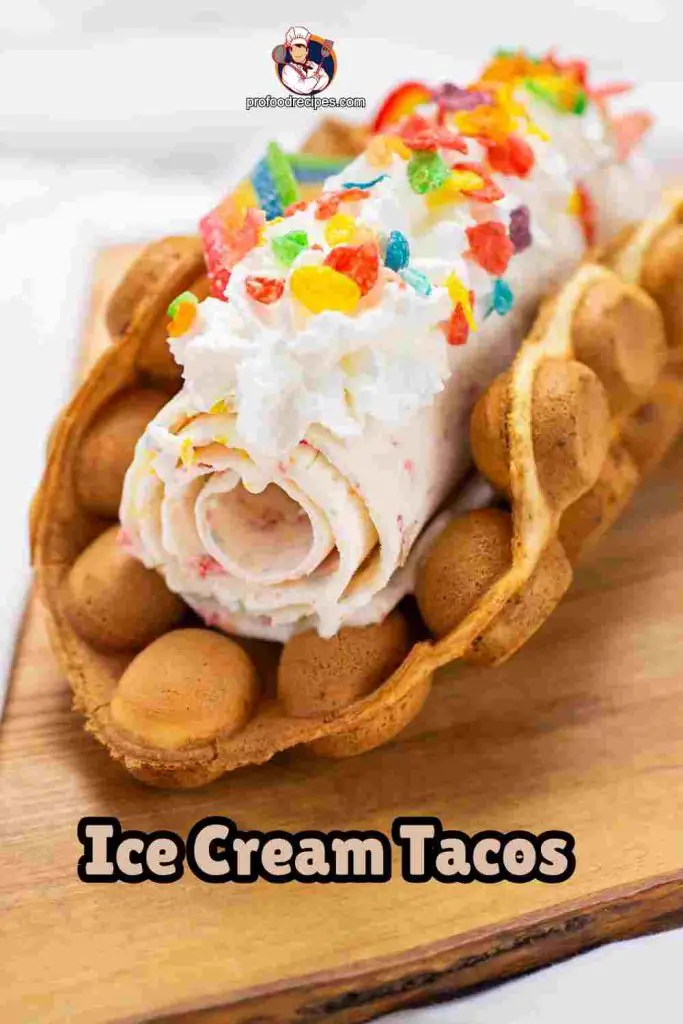
A tasty and novel dessert is created when crunchy taco shells are combined with the smooth texture of ice cream. They’re tasty, and you can personalize them with ice cream and toppings.
Ingredients:
- Small flour tortillas
- Your favorite ice cream flavors
- Cooking spray or melted butter
- Cinnamon sugar mixture (optional for coating)
- Chocolate syrup, whipped cream, sprinkles, and chopped nuts ( topping)
Process:
- Make taco shells out of little flour tortillas. If you want them to keep their form while baking, you can fold them in half and use toothpicks to hold them together.
- Spread melted butter on a paper towel and lightly brush the outside of each taco shell or spray them with cooking spray. Sweeten the shells with a cinnamon-sugar combination if you want.
- Place the taco shells directly on the oven rack to prevent them from losing shape while baking.
- To get the shells nice and crisp, bake them for 7 minutes in an oven warmed to 350 degrees Fahrenheit (175 degrees Celsius).
- After baking the taco shells, remove the toothpicks and set them aside.
- Once the taco shells have cooled, put ice cream inside of them. You can use a tiny ice cream scoop to make this process easier.
- When the taco shells have cooled, fill them with your favorite ice cream flavor. A little ice cream scoop is useful for this task.
- Enjoy the contrast of textures between the crunchy taco shell and the smooth ice cream by immediately serving your ice cream tacos.
36. Ice Cream Cake Pops

Enjoy the best of both worlds with the convenience of a popsicle shaped like an ice cream cake pop. A simple ice cream cake pop recipe is as follows:
Ingredients
- Lollipop sticks or cake pop sticks
- Pre-made ice cream cake or leftover ice cream cake
- Sprinkles, crushed cookies, or toppings of your choice
- Melting chocolate or candy melts (white, milk, or dark chocolate)
Process
- Freeze the ice cream cake for at least two hours, or until it is hard if you bought it already.
- After 2 hours of cake, take the ice cream out of the freezer and rapidly roll it into balls.
- Each cake ball needs a lollipop stick or cake pop stick inserted approximately halfway.
- Again, cake pops should be frozen for 15-30 minutes after they have been placed on a baking sheet covered with parchment paper.
- Melt your preferred melting chocolate in the microwave or a double boiler until it is completely melted and smooth.
- The cake pops should be removed from the freezer. After dipping each cake pop into the chocolate, allow the extra chocolate to drop out.
- Add any toppings you choose while the chocolate is still wet, such as sprinkles or crumbled biscuits.
- Place the decorated cake pops back on the parchment-lined baking sheet to dry. By placing them in the freezer for 10 or 15 minutes, you can speed up the process.
- Your ice cream cake pops will be ready to eat as soon as the chocolate covering has solidified.
37. Balboa Bars
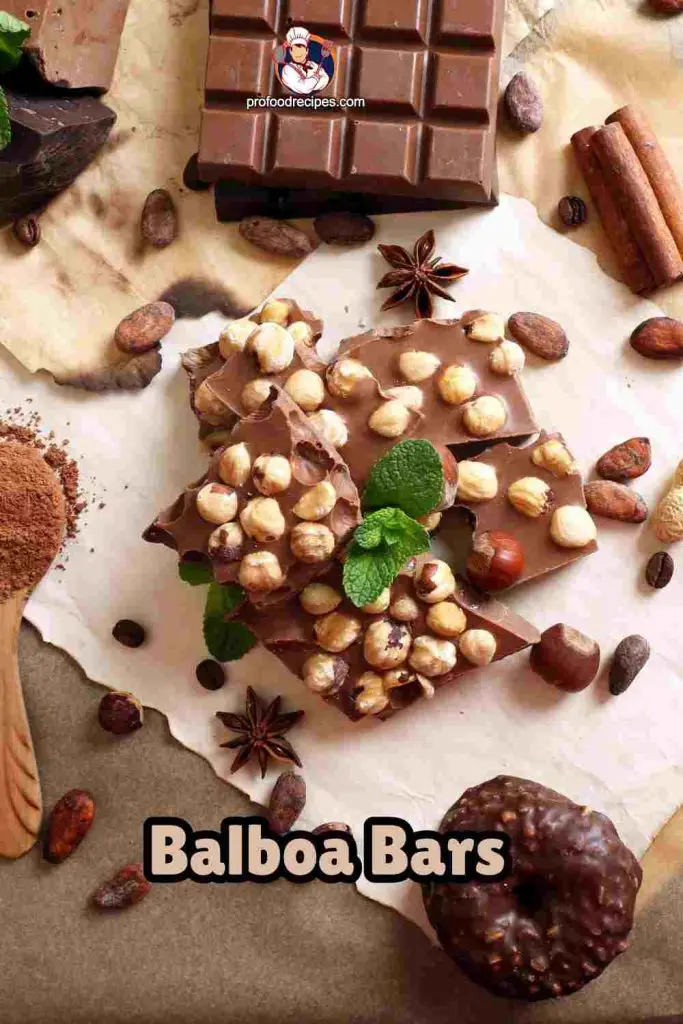
Frozen desserts called Balboa Bars are a specialty of the Balboa Peninsula in Newport Beach, Southern California. They’re spin-on ice cream bars with vanilla ice cream on a stick dipped in chocolate and topped with candies and other sweets.
Ingredients
- Vanilla ice cream bars (store-bought or homemade)
- Toppings of your choice (e.g., crushed nuts, sprinkles, crushed cookies, coconut flakes)
- Chocolate coating (chocolate chips or melting chocolate)
Process:
- Freeze the vanilla ice cream bars.
- Melt the chocolate coating over a double boiler or in a bowl that can go in the microwave.
- Each ice cream bar should be dipped into the melted chocolate to receive a chocolate coating.
- The chocolate-covered ice cream bar must have its toppings sprinkled on it immediately.
- The sprinkles for the ice cream bar coated in chocolate need to be added immediately. Enjoy.
38. Dirt Dessert
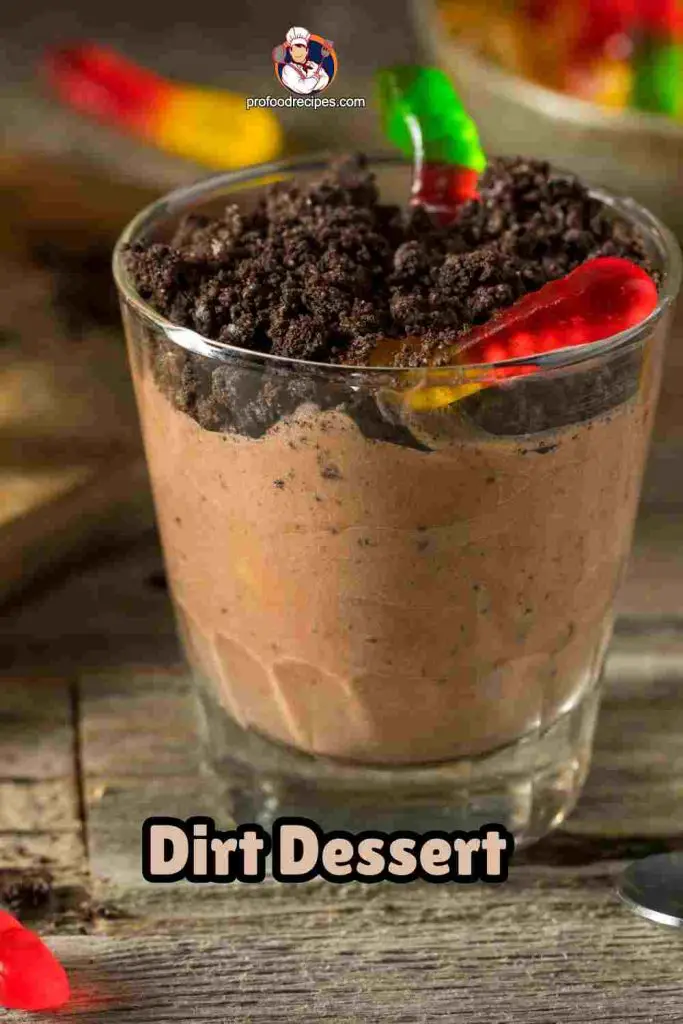
Desserts fashioned to look like a garden or a pot of soil are called “dirt desserts,” and they are a lot of fun. A fun and tasty no-bake dessert, s’mores pie is made by stacking layers of pudding, crushed cookies (often chocolate sandwich cookies), and gummy worms.
Ingredients
- 1 package instant chocolate pudding mix
- 1 cup powdered sugar
- 1 package (14 ounces) chocolate sandwich cookies (e.g., Oreos)
- 1/4 cup unsalted butter
- 8 ounces cream cheese, softened
- Gummy worms (for garnish)
- 2 cups cold milk
- 8 ounces whipped topping (like Cool Whip)
Process:
- If you want the cookies to look like dirt, crush them into crumbs. A food processor, a resealable bag, and a rolling pin may be used to smash them.
- In a sizable bowl, mix together the softened butter and cream cheese until completely incorporated.
- Gradually incorporate the powdered sugar into the mixture while stirring.
- Separately, thicken the instant chocolate pudding by whisking together cold milk and the mix.
- Mix the pudding and cream cheese until well combined.
- To make pudding, mix instant pudding with cream cheese.
- Create alternating cookie crumbs and pudding layers in individual serving cups or a big trifle dish.
- Dessert should be refrigerated for at least two hours, or until it is firm.
- Just before serving, scatter gummy worms on top to give it a fun finishing touch.
What Can I Serve at a Children’s Party?
Some parents are struggling to choose a menu for their children’s birthday, so previously we have mentioned some best 1st birthday food ideas that can be served at a first birthday party. Except for our mentioned food item, you can also serve – stuffed mushrooms, taco dip platter, hamburgers, cheese pizza, sweet butter corn, pasta salad, pinwheel pops, rainbow strawberries, chocolate dip cone ice cream, etc. at your baby’s first birthday party.
Final Verdict
Birthday is always an important and special day for a person, but as a parent, when it comes to your child’s 1st birthday, it is the most important and remarkable day for the parents.
So, on the above, we try to make much effort to give the best 1st birthday food ideas for making your child’s first birthday more special and more unique.
You May Also Like To Read :
- 21 Birthday Cake Idea
- 18th Birthday Cake Idea
- 16th Birthday Cake Idea
- Baby Girls 1st Birthday Cake Idea
- 3 Tier Birthday Cake for Girl